CHROME Budgeting & Financial Insights Tool

Welcome to CHROME's

Budgeting Insights Tool!

Mobile Phone with the Budgeting Insights Tool Homepage.


A smarter way to managing your money.


The new Budgeting Insights tool from CHROME FCU helps members successfully manage and track finances. The best part? There is no need to download a new app or program because it's located right in your online and mobile banking platform.

This new tool allows you to create budgets, monitor expenses, and set goals. There are also features to track your upcoming bills and income(s), and allow you to add and view all your accounts, even accounts not with CHROME FCU, in one convenient location.

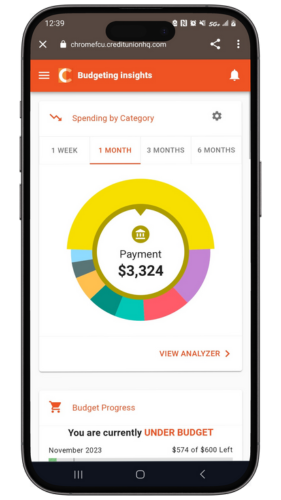
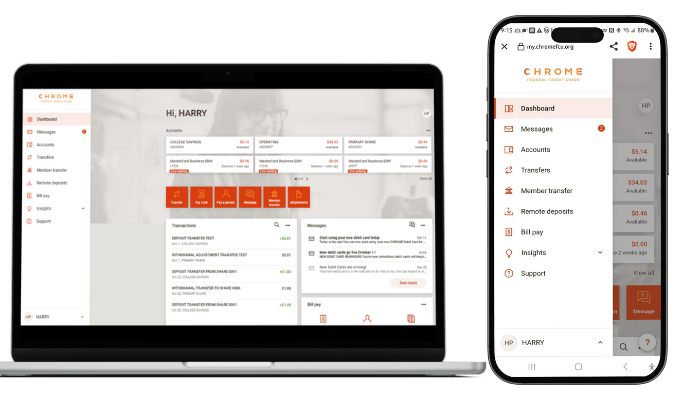
Where can I find my Budgeting Insights Tool?

Budgeting Insights is now available in your Online Banking and Mobile Banking , no need to download any extensions. Click on the menu button in the top right hand corner to find your Budgeting Insights, it will be labeled "Budgeting insights" on Mobile and "Insights" on Desktop versions.

A computer with CHROME's Online Banking homepage with the sidebar open showing Dashboard, Messages, Accounts, transfers, member transfers, remote deposits, bill pay, insights, support.

A Phone with CHROME's Mobile Banking homepage with the sidebar open showing Dashboard, Messages, Accounts, transfers, member transfers, remote deposits, bill pay, insights, support.

How to get started

Use this video to see quick tips on getting started with the many features in the Budgeting Insights tool.

How do I start?

1. Add additional accounts from other financial institutions to view all your accounts in one place.

2. Customize the 'tag' names on your transactions to get the most accurate financial picture.

3. Set up monthly Spending Targets within the 'Budget' area to organize your tagged transactions.

4. Use 'Cashflow' to track regular incomes and bills.

5. Create specific financial targets under the 'Goals' tab. If you have questions or issues with any of the above steps, reference the appropriate section of this FAQ. If you still can't find an answer to your question, please contact support.

What shows up on my Dashboard?
 
You can view the following items on your Dashboard:

• All uploaded accounts and their balances.

• Daily account transactions.

• Tiles which include Spending by Category, Budget Progress, Cashflow, Net Worth, and Goals Progress.

What browsers do you support?
 
We currently support modern browsers. If you have an older browser, try updating it to the most recent version.

You will also want to ensure that your security settings allow our Budget Insights tool to function properly.

You may experience issues if your browser has cookies turned off, is operating with a high security level or has additional add-ons installed. If you experience a problem, please contact CHROME Care at 724.228.2030 or care@chromefcu.org after verifying your browser settings. 

How do I find my financial institution?

If you are having trouble finding your financial institution, try these search tips:

1. Input your financial institution's official FULL name.

2. Then try searching with the fewest number of words possible.

• For example: Try typing one word at a time if your institution has a long name. If your financial institution has an abbreviation, (i.e., SECU) try searching that as well.

3. If your financial institution has a city name or other unique word in it, try searching only by that term (i.e., 'Springfield' or 'River').

If you still cannot locate your financial institution, please contact support to verify whether it can be supported.

How do I delete an account?

You have the ability to delete and archive accounts that you have manually added to Budgeting Insights. However, at this time you cannot remove accounts that come over automatically. You will go through the process of adding an account in order to delete an account.

1. Access your accounts by clicking the three dots in the upper right corner and select ‘Link Account.’ Search for your financial institution, accept the Terms and Conditions, and log in using your user id and password for that institution.

2. You will be directed to the page listing all of your eligible accounts. Uncheck the account(s) you no longer wish to see. Click Submit.

3. The account will show under the Inactive tab. If you want to permanently delete the account, you will click on the Archive button.

4. Keep in mind that this will remove all custom tags, goals, etc. that are associated with this account.
How do I create a Goal?

1. Click ‘View Goals’ in the Goals Progress tile or click 'Goals' at the top of the page. 

2. Click the 'ADD GOAL' button.

3. Choose the goal you would like to create. If you do not see the goal you want to add, there is a ‘Custom payoff goal’ and a ‘Custom savings goal.’

4. Choose which account you would like the goal to be associated with and the amount you want to save. Remember you can link to external accounts if you have previously added them to Budgeting Insights.

5. Decide if you want to include the balance in tracking your goal. If not, delete the amount from ‘Start tracking _ towards my goal’

6. Choose the date you want to have this goal completed or how much you are able to save each month - this option will calculate a due date for you.

7. Click ‘Save.’
 
What does it mean to ‘lock’ funds?

When creating a Goal, you may choose to 'lock' a sum of money from being counted toward your goal. This provides an accurate reading of your current goal progress, as you may never want to leave less than the locked amount in your account. No real money is ever locked away from you by choosing this option.
How do I use my Cashflow Calendar?

Use Cashflow to get a quick glance of when your bills are due, when your paycheck is coming, and for viewing 'safe to spend' balances. Click 'Cashflow' to open the calendar and click on a day to add a new income source or bill due.

How do I select which accounts make up the daily cash balance?

1. On the Cashflow tile, click 'View Cashflow.' Click the three vertical dots in the upper right corner and select Configure Accounts.

2. Check the boxes next to the accounts you would like to include.

Why don't I see my income schedule as an option?

Cashflow is not meant for variable income, so in order to account for possible variances, input your best guess ahead of time and edit once the exact value is known. The daily balance will automatically adjust to the actual income deposited into your account. Here are some tips:

• The 'Every other week' option is for one paycheck every two weeks (separated by 14 days). Just choose the day of the week that you get paid.

• The 'Twice a month' option is always fixed on the 1st and 15th of each month.

• If you're paid on off-dates, say the 3rd and the 18th, simply enter two separate 'Once a month' incomes (i.e., one on the 3rd and another on the 18th). This will allow the calendar to display your income correctly.
How do I add an asset/debt?

1. Click ‘View Net Worth’ on the Net Worth tile or select ‘Net Worth’ at the top of the page.

2. Select the 'ADD ASSET' or 'ADD LIABILITY' button.

3. Enter in the amount of the Asset or Liability and label it accordingly.

4. Save the asset or liability.

5. You may also link external accounts you want included in your Net Worth by clicking the ‘Link Account’ button.
How do I export transactions from my account to create reports?

You can export your transactions into a 'CSV' file, which is supported by most spreadsheet programs.

1. Click ‘View Transactions’ in the Transactions tile. Click the small 'Export' button in the upper right corner.

2. A CSV file will be saved to your computer's download folder.

Can I delete a transaction?

Yes, you can remove transactions. These transactions will still be visible on your account directly but will no longer show in Budgeting Insights. Please note that this is a permanent action and cannot be undone.

• Click ‘View Transactions’ in the Transactions tile.

• Select the transaction you want to delete and click 'Delete.’

What is a 'tag'?

A tag is a customizable word or phrase used to categorize your transactions. This feature gives you a better idea of how you are spending your money by tracking transactions in the same category. We will automatically pull in your most recent transactions and tag them (i.e., transportation, groceries, clothing). We suggest you edit your tags

by selecting the tag and start typing the new tag and select it from the list or type a new tag. Customized tags give you a more accurate view of your budget(s), spending history and overall financial picture.

What if I have a transaction that falls under multiple categories? ('Split Tags')You can apply multiple tags to transactions, such as ATM withdrawals, by using the 'split tag' feature:

1. Click on any transaction to edit it.

2. Click the 'USE SPILT TAG' button.

3. Enter a tag and its value.

4. Repeat the process for each tag, ensuring that the entire balance of the transaction is accounted for.

5. Click the '+ADD TAG' button if you want to split the purchase between more than two tags. There is no limit to the number of split tags you can have.

6. Click 'SAVE’.

What is a tagging 'rule'?

If you would like to change a transaction's title and/or edit the tag to be applied to similar transactions, check the box that says, ‘Apply this tag and title to all similar transactions.’

Creating rules for certain transactions, such as a 'Check' transaction, is not advised. It will apply that title and tag to all other checks. Please contact support if you have additional questions regarding tagging rules.
What are Alerts?

Alerts are personalized notifications sent to your email and/or mobile device which help you keep track of your account activity. Be alerted of upcoming bills, monitor account balances to avoid fees, and review transactions of a certain amount or from a particular store.

How do I set up Alerts?

1. Click the three vertical dots at the top of the page and select 'Alerts'.

2. Click the + sign in the lower right corner to get started.

3. Choose your Alert type:

• Account Balance
• Goal Progress
• Specific Store Purchase
• Spending Target Exceeded
• Large Transaction
• Bill Reminder

4. Enter the appropriate values as prompted (i.e., account, amount, percentage)

5. Choose the Alert Option(s):

• Email
• Text Message
• All of your Budgeting Insight alerts will appear on the Dashboard once they have been triggered.

6. Click 'SAVE'.

7. Please keep in mind that there is often a slight delay between triggering an alert and receiving it, as we have to wait until a transaction is posted to send a related alert.